
When Should I Put Contacts into a Sales Group?
Let's say one of your customers asks about a special discount or wants to know when a certain promotional item will become available. You can add them to a Sales Group for tracking purposes and later follow-up. As you interact with your customers throughout the day, they may wonder when your business will make available a new upgrade or release a new product. Maybe they want to be invited the next time your organization hosts a community meeting or has a clearance sale for old stock. As you learn about what your contacts are interested in, you can start sorting them into applicable Sales Groups so that in the future, when that product, service or event becomes available, a marketing person can quickly locate those contacts again and send them a courtesy notice matching their inquiry. When a contact tells you what they are interested in, put them in a matching Sales Group so that your future marketing efforts will be able to precisely target those contacts who want to know more about that upcoming event, new product or service offering.
We recommend that Team Administrators first get together with their Marketing person to decide what 8 categories would make the best Sales Groups for future text message alerts. Unlike private My Groups that appear only in a User's personal Phonebook, the 8 Sales Groups are shared Team-wide (i.e. they are the same in all Phonebooks belonging to your team). This allows everyone on your team to sort their contacts into the same 8 Sales Groups as they respond to customer requests throughout the week. Once the Team Lead has labeled some Sales Group categories, they may want to explain to their team what the marketing strategy is behind each Sales Group so team members can quickly identify which contacts would be interested in receiving that alert at a later time..
Sales Group topics can change in response to the buying habits or appointment scheduling behaviors of your customers. Let's say you work in an office that has slow days and busy days. Maybe some of your contacts have complained about the wait time on the busy days. You could put them in a Sales Group called "Please Notify When Business Is Slow." If you see that your Tuesday afternoon is empty, then send out a text Tuesday morning to this Sales Group offering them a 15% discount if they can make it to an appointment that afternoon.
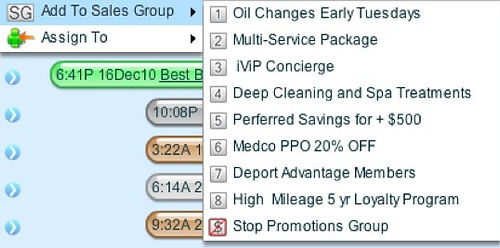
Users can put a single contact in a Sales group by clicking on the blue circle next to the contact's name in their Record area. Under the Add To Sales Group section, you can select the applicable Sales Group(s). When a contact has been added to a particular Sales Group, the number for that Sales Group will turn dark brown. (You can also see which markers and Sales Groups a contact is listed under by clicking on the faint orange arrow to the left of the contact's name in the Phonebook.) If a contact does not want to receive any marketing from your company, then put them in the Stop Promotions Group - symbolized by the [No $] sign.
Removing or Editing Contacts within Sales Groups
Let's say you want to remove all contacts from an outdated Sales Group and create a new label for it. First open your Phonebook and click on the Sales Group you want to reuse - when selected, it will turn dark brown. Click the Select All Contacts button, then click the Delete Selected button [ -- ]. You will be asked if you want to Remove From this Group? Answer Yes. Now click the Edit Mode button (with the Pencil on it, just left of the [C] button). The Pencil will turn dark brown on the toolbar. Now you can edit the name of the outdated Sales Group by clicking on it and filling in a new label. Toggle OFF Edit Mode by clicking on the Pencil again.
You can add multiple contacts to this new Sales Group at the same time. First locate the contacts that would be interested in this new Sales Group category - either by single mouse clicking on them individually - or you can use the Phonebook filters to find contacts matching a specific criteria. Then click the Show [ALL] Selected Contacts button (to the immediate left of the TO: button). Now use your mouse to Drag and Drop these selected contacts into the new Sales Group.